RDP “An authentication error occurred” “This could be due to CredSSP encryption oracle remediation”.

Trying to RDP from Windows 10 to a “server” you may get:


I wrote “server” since the target can also be another Windows client and not only servers.


Cause:

In May 2018 Security update Microsoft are enforcing CVE-2018-0886 fix.
So if the client has the latest updates but the “server” doesn’t you would not be able to connect.

CVE-2018-0886 Allows a remote code execution vulnerability due to how CredSSP validates request during the authentication process, aka “CredSSP Remote Code Execution Vulnerability”

Fix:

Go to all the “servers” and install the latest Security update from Microsoft (or at least May 2018)
Stay secure is always good

Workaround:

Not recommended since there are Exploits in the wild and you should upgrade all the “servers”

But here it is anyway
In the client

  1. run GPEDIT.msc
    Goto Local Computer Policy Computer Configuration Administrative Templates system Credentials Delegation
    In it go to Encryption Oracle Remediation
  2. Change it to Enabled
    and chose Vulnerable

    Mitigation 2

If it is not possible to access to Local Group Policy Editor on the client (i.e. Windows Home versions), same change can be done through the registry:

REG  ADD HKLM\Software\Microsoft\Windows\CurrentVersion\Policies\System\CredSSP\Parameters\ /v AllowEncryptionOracle /t REG_DWORD /d 2


Microsoft has by now published a full explanation:

https://blogs.technet.microsoft.com/mckittrick/unable-to-rdp-to-virtual-machine-credssp-encryption-oracle-remediation/

Posted in Uncategorized | Leave a comment

ניקוד בעברית בחלונות 10

כיצד לנקד בחלונות 10

בשיטה החדשה הניקוד נעשה על ידי לחיצה על שני מקשים: AltGr (זה הALT הימני – מימין למקש הרווח) + מקש ניקוד.
מקש הניקוד הוא האות הראשונה בשם סימן הניקוד (ק=קמץ, פ=פתח, ח=חיריק וכו’). 
במקום AltGr אפשר גם ללחוץ יחד על שני המקשים השמאליים Alt+Ctrl


הניקוד

AltGr ו-

דוגמה

מעוררי זכרון

שווא

ש

ש ְ

מתאימים לאות הראשונה
בשם הניקוד

חיריק

ח

ח ִ

צירה

צ

צ ֵ

סגול

ס

ס ֶ

פתח

פ

פ ַ

קמץ

ק

ק ָ

שין ימנית

‘W

שׁ

דומה לאות שין

שין שמאלית

/Q

שׂ

מקש שׂמאלה משׁ

חולם

ו

מוֹ


דגש, מפיק, שורוק

ד

פּ,וּ

בגלל המילה דּגש

קובוץ

\

\ ֻ

דומה ל-סימן של שלוש הנקודות

חטף סגול

ב

ס ֱ

כל החטפים
נמצאים אחד ימין
משם הניקוד המקורי

חטף פתח

]

פ ֲ

חטף קמץ

ר

ק ֳ

לא עובד לי – איך להגדיר את המחשב שיתמוך:

לקח לי זמן להבין למה יש 2 עברית בעברית ולפעמים רואים HE3

בכל אופן יש עברית ועברית (סטנדרטי)

  • עברית משתמש בשיטת הניקוד הישן (Caps Lock ואז Shift ומספר)
  • עברית (סטנדרטי) משתמש בשיטת הניקוד החדשה


  1. ליד השעון ללחוץ על השפה ואז יפתח תפריט הנ”ל
  2. ללחוץ על הגדרות שפה
  3. ללחוץ על עברית
  4. ללחוץ על אפשרויות
  5. לסדר שיהיה רק את עברית (סטנדרט)


Posted in Uncategorized | Leave a comment

SPAM מ-LINKEDIN

ב4 בבוקר התעוררתי מ-4 התראות רצופות בטלפון שלי.

בכל אופן הלילה שאחרי OpIsrael אז החלטתי לבדוק מה קרה.

גיליתי 4 בקשות חברות חדשות מהאפליקציה של linkedin

זה די קל היה לזהות שזה SPAM ואני לא מכיר את אנשים אילו.

אז נכנסתי לחשבון ה-Linkedin שלי (דרך המחשב)

בדקתי את ההזמנות הנכנסות

בחרתי IGNORE

ואז במעלה המסך הופיע הודעה ירוקה שקצת קשה היה לראותה:

ושם בחרתי Report as SPAM


וזאת בתקווה שאם מספיק אנשים יעשו Report as SPAM חשבונות אילו יסגרו ע”י Linkedin ולא יפילו אנשים תמימים.

Posted in Uncategorized | Leave a comment

White list generator for linux

During CSI course in John Bryce, Gil Rozenberg asked to build a script to build whitelists.

Meaning using iptables to allow opening http or ftp from the server is a bit too wide permission and would allow the server to go to “bad” places.

To prevent it you may want to use whitelist, doing it one by one is a bit problematic.

So you can use ipset to speed it up

Iptables -A OUTPUT -m set –match-set apt-white dst -j ACCEPT  

But how do you create one?

I used python script that takes a list of filenames scan then and add it to the whitelist

So I create a file flist.txt that contains

/etc/apt/sources.list
/etc/apt/sources.list.d/google-chrome.list

(Thanks to Alex there is an automated way to do it)

sudo grep http -Ril /etc/apt/ > flist.txt

#!/usr/bin/python
# Written By Gady Margalit
# 3 Aug 2014
#schedule with cron....

from urlparse import urlparse
import re,sys
import socket
from subprocess import call

try:
 fname = sys.argv[1]
except:
 print 'no arg, please provide filename that contains list of files to scan'
 quit()

hosts = set()

#fsource --> the file to parce
SrcList = open(fname,'r')
for fsource in SrcList.readlines():
 f = open(fsource.rstrip('\n'),'r')
 for line in f.readlines():
 line = re.findall(r'(ftp|https?://\S+)',line)
 if line:
 parsed=urlparse(line[0])
 hosts.add(parsed.hostname)
 f.close()
SrcList.close()

#delere previous ipset (apt=whitelist is the name)
call(['ipset','destroy', 'apt-whitelist'])
#Create new ipset by the name of apt-whitelist
call(['ipset','create', 'apt-whitelist' , 'iphash'])

for host in hosts:
 ip = socket.gethostbyname(host)
 #print Domain and IP
 print host, ip
 # add ip to ipset
 call(['ipset','-A', 'apt-whitelist', ip])

Then run it as sudo python whlist.py flist.txt

Posted in Uncategorized | Tagged , | Leave a comment

Python and MSSQL performance

I did a job that scribe data from web site and put it in MSSQL.
I wrote it in python using pyodbc.
But I discovered writing multiple record to MSSQL server using pyodbc is very slow
So after some digging in I found a way to make it much faster.
And here are the results:
Running 100 inserts
To save to DB myway 0:00:00.166000
To save to DB execute 0:00:07.265000
To save to DB executemany 0:00:14.173000

Running 2000 inserts (Azure DB)
To save to DB myway 0:00:01.194000
To save to DB execute 0:02:24.632000
To save to DB executemany 0:04:48.415000

Running 2000 inserts (LAN DB)
To save to DB myway 0:00:00.524000
To save to DB execute 0:00:17.183000
To save to DB executemany 0:00:31.523000
So how did I do it?
I created my own lib called MSSQL.py


import pyodbc
# MSQL functions Version 0.5
import datetime

#CONNECTION_STRING = "DRIVER={SQL Server};SERVER=localhost;DATABASE=master"

def CreateCursor(CONNECTION_STRING):
    return pyodbc.connect(CONNECTION_STRING).cursor()


"""
# samples
cursor.execute("select top 10 * from stocks")
rows = cursor.fetchall()
for row in rows:
    print row.TickerSymbol, row.Company
cursor.close()
"""


def encapsulate(value):
    #Encapsulate the input for SQL use (add ' etc)
    if isinstance(value, list):
        r = []
        for i in value:
            if isinstance(i, basestring):
                r.append(encapsulate(i))
            else:
                r.append(str(encapsulate(i)))
        return ','.join(r)
    elif isinstance(value, str):
        return "'" + value.replace("'", "''") + "'"
    elif isinstance(value, unicode):
        return "N'" + value.replace("'", "''") + "'"
    elif isinstance(value, datetime.datetime) or isinstance(value, datetime.date):
        return "'" + value.isoformat() + "'"
    elif value is None:
        return "Null"
    else:
        return str(value)
        #cursor,user.fbid,user.name,user.age,user.gender,user.device,user.platform,DeviceTypesDic, platformTypesDic


def enlist(rows):
    #Takes a list of items and make them in format for SQL insert
    #limit of 1000 lines
    clLists = []
    cl = []
    LineCounter = 0
    for i in rows:
        if LineCounter >= 1000:
            clLists.append(",".join(cl))
            cl = []
            LineCounter = 0
        cl.append("(" + encapsulate(i) + ")")
        LineCounter += 1
    clLists.append(",".join(cl))
    return clLists


def CreateDicForTable(table, cursor):
    cursor.execute("select * from %s" % table)
    rows = cursor.fetchall()
    dic = {}
    for row in rows:
        dic[row[1]] = row[0]
    return dic


def RefeshDicForTable(table, TableDic, NewItemsList, cursor):
    #Gets table dictionary and new items rows, add the new items to the DB and update the Dict with new keys
    cursor.execute("select isnull(max(%sID),0) as MaxID from %s" % (table[:-1], table))
    maxID = cursor.fetchone()[0]
    for NewItems in enlist(NewItemsList):
        cursor.execute("Insert into %s (Name) Values " % table + NewItems)
    cursor.commit()
    cursor.execute("select * from %s where %sID > %d" % (table, table[:-1], maxID))
    rows = cursor.fetchall()
    dic = TableDic
    for row in rows:
        dic[row[1]] = row[0]
    return dic


def Dic2List(ListofDicts):
    if len(ListofDicts) > 0:
        fields = ListofDicts[0].keys()
        ll = []
        for dic in ListofDicts:
            dictlist = []
            for key, value in dic.iteritems():
                dictlist.append(value)
            ll.append(dictlist)
    else:
        fields = []
        ll = []
    return (fields, ll)


def enfields(fields):
    tempfields = []
    for field in fields:
        tempfields.append('[%s]' % field)
    return "(" + ",".join(tempfields) + ")"


def insertListDic(ListofDicts, table_name, fieldsOverRide, cursor):
    # must get only one table
    (fields, datas) = Dic2List(ListofDicts)
    if fieldsOverRide != "" and fieldsOverRide is not None:
        fields = fieldsOverRide
    for data in enlist(datas):
    #    print ("Insert into %s %s Values %s" % (table_name, enfields(fields), data))
        cursor.execute("Insert into %s %s Values %s" % (table_name, enfields(fields), data))
    cursor.commit()


def CreateDicForTypesTable(table,cursor):
    cursor.execute("select * from %s"%table)
    rows = cursor.fetchall()
    dic = {}
    for row in rows:
        dic[row[1]] = row[0]
    return dic

def updateTypeDic(TypeDic,table_name,CodeName,dataset,cursor):
    if len(dataset) >0:
        dataset -= set(TypeDic)
        if len(dataset) >0:
            cursor.execute("select isnull(max(%s),0) as MaxID from %s" % (CodeName, table_name))
            maxID = cursor.fetchone()[0]
            for data in enlist(dataset):
                cursor.execute("Insert into %s (Name) Values %s" % (table_name ,data))
                cursor.commit()
            cursor.execute("select * from %s where %s > %d" % (table_name, CodeName, maxID))
            rows = cursor.fetchall()
            for row in rows:
                TypeDic[row[1]] = row[0]
    return TypeDic

def writetoDB(datalist, table_name, fieldsnames, cursor):
    for data in enlist(datalist):
        cursor.execute("Insert into %s %s Values %s" % (table_name, enfields(fieldsnames), data))
    cursor.commit()

To test it create table

create table test (c50 varchar (50) , C15 varchar(15))

and use TestSQLSpeed.py

from MSSQL import *
import datetime
import time

Server = 'myserver'
User = 'username'
Password = 'password'
DatabaseName = 'TestDB'
CONNECTION_STRING = "DRIVER={SQL Server};SERVER=%s;UID=%s;Database=%s;PWD=%s" % (Server, User, DatabaseName, Password)

#CONNECTION_STRING = "DRIVER={SQL Server};SERVER=localhost;DATABASE=master"

#print CONNECTION_STRING

cursor = CreateCursor(CONNECTION_STRING)


def timepassed(started,message):
 print message, datetime.datetime.fromtimestamp(time.time())-started
 return datetime.datetime.fromtimestamp(time.time())

started = datetime.datetime.fromtimestamp(time.time())

started = timepassed(started, 'toget cursor')
r=[]
for i in range(2000):
 r.append(['hello%d'%i,'2this is a test'])

started = timepassed(started, 'To build list')

for data in enlist(r):
 cursor.execute("Insert into test (c50,c15) Values " + data)
cursor.commit()

started = timepassed(started, 'To save to DB myway')

for data in r:
 cursor.execute("Insert into test (c50,c15) Values ('%s','%s')" % (data[0],data[1]))
cursor.commit()
started = timepassed(started, 'To save to DB execut')


cursor.executemany("insert into test (c50,c15) Values (?, ?)", r)
cursor.commit()
started = timepassed(started, 'To save to DB executemany')


cursor.close()

Point proven 🙂

Posted in Uncategorized | Tagged , | 11 Comments

Why should you use outlook and not web client

  1. You can use email offline. (also means no wait time to

    upload / download attachment since it’s done in the background)

  2. You can have several accounts configured in the same

    interface (no need to logout/login)

  3. Search works between all your accounts.
  4. You have an integration to the windows system so you can do:
    1. Send to mail recipient – This is right click on any file.
    2. Send file you work on, in Office directly from the open document

      (File –> Send to)

    3. When you click on email address it opens up in outlook (no need to

      copy the email address and go to email web client)

    4. Automatic compression of pictures when you send them via file –>

      send to –> Mail recipient

  5. Outlook integrates with facebook (and linkedin and live….) shows you the

    picture, and last activities of the contact you work with.

  6. Easy opening of any attachment your desktop can show.
  7. Same editing GUI as Word
Posted in Uncategorized | Leave a comment

How do I lock cells on Excel so that people cant change them?

Many time you wish to give someone an excel that they can’t modify it all or part of it.
Like  sales order form you wish them to change just the quantities and not the price or item name.

So how do you do it?

Excel by Default locks all cells (But it tell the workbook to ignore the locks)

So what do you have to do:

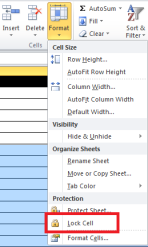
  1. You need to unlock the fields you wish people to be able to modify, you do  it the following way:
    1. Select the cells that you want to unlock (you can marks several areas using CTRL)
    2. Go to format cell (CTRL-1)
    3. Click on the Protection tab
    4. image

    5. Clear the Locked check box and click OK
      You can also do it from Home –>Format (under Cell area)  image
      The lock is actually a checkbox that it marks image  – locked and image  unlocked
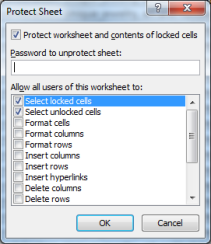
  2. Now you need to tell Excel to protect the locked fields,
    1. In Excel 2007/ Excel 2010 Home–> format (Under Cell)–> Protect sheet..
      image 
      In Excel 97-2003
      On the Tools menu, point to Protection, and then click Protect Sheet. Type a password if you want one, and then click OK.
    2. Now just click OK (or put in a password and click OK)
      image 

Just remember the password 🙂

Posted in Uncategorized | Leave a comment

Hello world!

Welcome to WordPress.com. This is your first post. Edit or delete it and start blogging!

Posted in Uncategorized | 1 Comment

MM/DD/YYYY vs DD/MM/YYYY in Excel

Excel uses the same date format as you set in your regional settings.

Unfortunately some times you get text files with dates in the wrong format and when you paste it to excel you’d get some as text (because month can’t be bigger than 12) and some as dates but the month and day are mixed.


To solve this I build the following Excel formula

=IF(ISERR(DATE(YEAR(A1),DAY(A1),MONTH(A1))),DATE(MID(A1,SEARCH("/",A1,SEARCH("/",A1)+1)+1,4),LEFT(A1,SEARCH("/",A1)-1),MID(A1,SEARCH("/",A1)+1,2)),DATE(YEAR(A1),DAY(A1),MONTH(A1)))


Enjoy

Posted in Uncategorized | Leave a comment

יצירת קובץ csv לייצוא אנשי קשר מוואלה

תודות לערןץ דואר ערוץ 7 שבנה יצוא אנשי קשר לצורך יבוא לדואר שלהם,
שיפרתי מעט את הסקריפט שלהם ועכשיו אפשר ליצא את אנשי הקשר מWALLA ל קובץ CSV ולא רק ליבוא אליהם

יצירת קובץ csv לייצוא אנשי קשר מ”וואלה”
1. העתק/י את שורת הקוד הבאה ע”י צביעת הטקסט עם העכבר ולאחר מכן המקשים (Ctr+c):

javascript:w=window; s='<form name=f><textarea name=csv>שם פרטי,שם משפחה,דוא\"ל\n’; for (i=0; i<=contacts.length-1; i++) s+=contacts[i].fname+’,’+contacts[i].lname+’,’+contacts[i].email+’\n’; s+='</textarea></form>’;w.document.write(s);

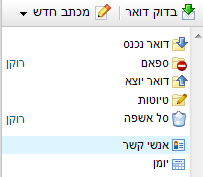
2. גש/י לעמוד אנשי הקשר בדואר וואלהclip_image001
3. הדבק (Ctrl+v) את הקוד בשורת הכתובת בחלקו העליון של הדפדפן.
לחץ “ENTER”. (במידה ועולה לך חלון להרשאת חלונות צפים (Pop ups) בחר באישור קבוע לאתר זה. נדרש לחזור על הפעולה של הדבקת הקוד ולחיצת ENTER).
זהו העתיקו את התוכן מהחלון קובץ ושמרו ב CSV

Posted in Uncategorized | Leave a comment